RockRecorder records the audio Avtec forwards to it from VPGate endpoints. Each transmission is its own recording, marked as transmit or receive, with the radio ID that keyed up.
You need to be a SuperAdmin, and the server needs the Avtec license.
Recording Avtec Scout consoles? See Connecting Avtec Scout consoles.
Before you start: Audio Forwarding in Avtec
In Avtec Scout Manager:
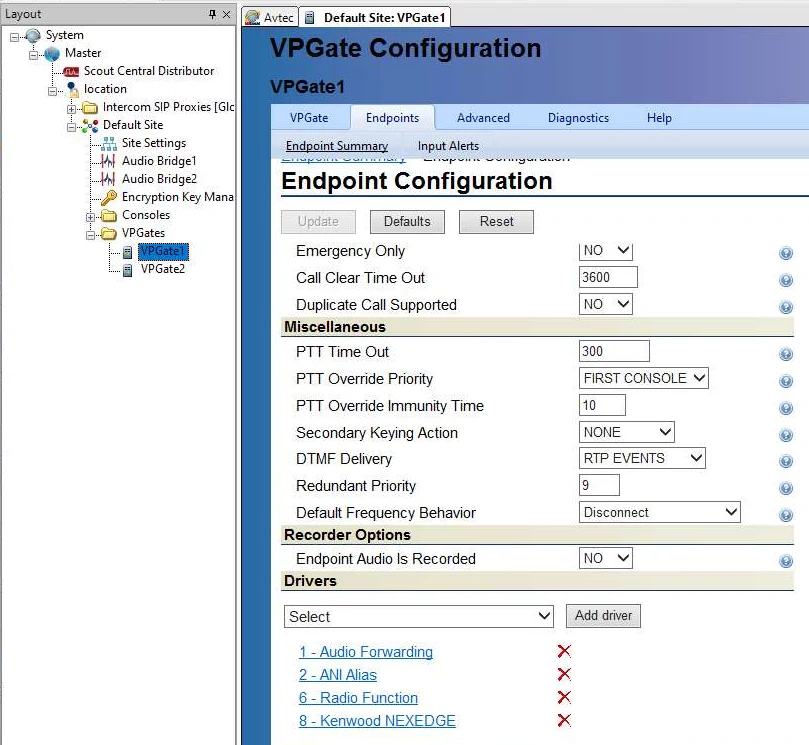
- In the tree on the left, open your site's VPGates and click the VPGate.
- On the Endpoints tab, under Endpoint Summary, click the endpoint to record.
- Under Drivers, click Audio Forwarding. If it isn't listed, choose it in Select and click Add driver.
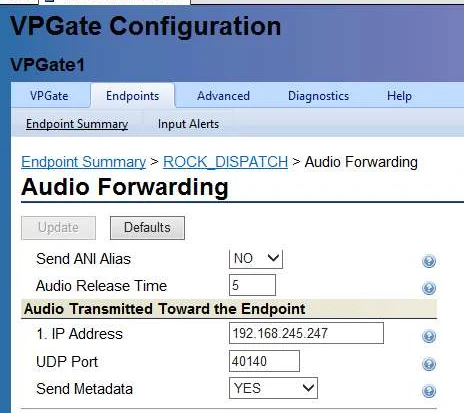
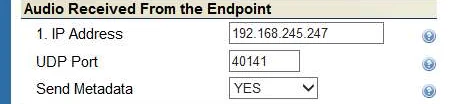
On the Audio Forwarding page, fill in a free numbered slot in each of the two sections:
| Section | IP Address | UDP Port | Send Metadata |
|---|---|---|---|
| Audio Transmitted Toward the Endpoint | The RockRecorder server's IP address | A port such as 40140. This is the channel's TX port in RockRecorder | YES |
| Audio Received From the Endpoint | The RockRecorder server's IP address | Another port, such as 40141. This is the channel's RX port | YES |
Then click Update.
- Use a different pair of ports for each endpoint.
- Send Metadata gives each recording the radio ID. Avtec sends the audio on UDP and the metadata on TCP, to the same port numbers, so if there's a firewall between them, allow both.
- The endpoint's audio must be G.711 or G.729. G.726 isn't supported.
1. Add the Avtec interface
If you already have an Avtec interface, for consoles for example, add the endpoints to it and skip to step 2.
- Open the user menu (top right) and go to Administration > Recording > Recording Interfaces.
- Click New recording interface.
- Give it a name, choose Type: Avtec, and pick the Network card (NIC) Avtec sends to.
- Click Create interface at the bottom of the page.
2. Add the channels
On the interface's Channels tab, add one channel for each endpoint, either:
- Type them in: fill in the empty top row (Channel, TX port, RX port) and click Add.
- Import a CSV: use CSV > Download template, fill it in (
channel,txport,rxport,gain_db,enabled), then CSV > Import from CSV….
| Field | Allowed values |
|---|---|
| TX port / RX port | 1 to 65535, the UDP ports you set in Audio Forwarding. One of them can be blank. No other channel can use them |
| Gain | -20 to +20 dB; 0 is normal |
Then click Apply at the top of the interface page.
3. Check it's working
Key up on the endpoint. The recording appears on the Recordings page when the transmission ends, with the radio ID in the UID column.
The recorder's log, /opt/rockrecorder/logs/avtec.log, shows what's happening:
| Log says | Meaning |
|---|---|
Listening on port … → 'Dispatch 1' TX |
The channel is set up |
Metadata connection from … |
Avtec has connected to send metadata |
Metadata: name '…', ID 30010, … |
The radio ID for a transmission arrived |
Saved … (4.20s, ID 30010) |
A recording was saved |
Ignoring … (recorded: G.711, G.729) |
Avtec sends a format that isn't recorded. Set it to G.711 or G.729 in Avtec |
Could not listen on … |
The port can't be used. Check the channel |
Recordings arrive but without a radio ID? Send Metadata isn't YES in Audio Forwarding, or a firewall blocks the TCP port. Nothing in the log? The audio isn't reaching the server. See A channel has no recordings.
Radio aliases
Avtec sends the radio ID, not a name. To show names, go to Administration > Alias Banks > Avtec, add Radio ID and Alias pairs (or import a CSV), and click Apply. New recordings from those radios get the alias. Existing recordings keep the alias they were saved with.
To use different names on different channels, click New bank, name it and tick the channels that use it. Channels without a bank use Default.